Becoming a Pythonista
11-13 minutes to read
In Part 1 of ‘A Journey into Python’, I outlined the importance of dedicating time to create a realistic yet flexible roadmap. In an article prior to that I examined the importance of assessing where your values are right now, and how well aligned they are with employment opportunities in your given sector. Now, I’m going to take a dive into whats required to make the leap from Python beginner to pro.
Apologies in advance if you are overwhelmed by any of the code shown, but It’s not my objective to teach you Python theory in this article. I instead wish to demonstrate what a development pathway for a Python programmer potentially looks like.
I will however be deconstructing the theory behind Python code in future articles, so please keep an eye out for them.
Article Sections …
- The beginning of your Python adventure.
- You’ve done the hard part, now it’s time to thrive.
Cautionary note: do not read on if you despise coders that celebrate the efforts of their peers!
1. The beginning of your Python adventure.
1a. A reminder of the fundamentals.
As discussed in ‘A Journey into Python’ Part 1, good courses should initially cover the fundamentals:
- Data types
- Operators
- Variables
- Conditions
- Conditionals (if, else if, and else)
- Looping (for and while loops)
- Lists
- Dictionaries
- Sets
- Functions
A course I purchased from Udemy called ‘100 Days of Python’ by Angela Yu, addressed the fundamentals shown above within the first week. In fact, I was creating small projects from day 1, and within a fortnight I was able to formulate an idea completely from scratch.
I’m going to cover some of the middle and advanced concepts found in Python a little later in this article. If you want to know more, please refer back to my last article where I summarise solid roadmap suggestions proposed by Tech With Tim.
Please note that my approach to learning Python isn’t exactly linear. I’m certainly gaining momentum in acquiring the fundamentals, whilst also applying Python to more complex concepts via web and game development. Simultaneously, I’m incorporating advanced Python features which are necessary for both task automation and database management.
It definitely explains the gaps I have in my knowledge, but it also explains why I’m not generating random projects from scratch all the time. Instead, I’m fostering a more focussed approach to designing, developing and optimising programs.
1b. Applying the fundamentals – The Coffee Machine Project.
In a moment I’ll be diving into another Tech With Tim YouTube video entitled ‘Master Python With This ONE Project’. But before I do that, I want to briefly mention what walk-throughs were a catalyst in accelerating my progression, whilst providing invaluable insights into the possibilities of using Python.
For me, I gained a lot from the Python project ‘Coffee Machine’ (courtesy of ‘100 Days of Python’). I’m not going to share the code as I don’t wish to flout copyright laws. Instead, I’m simply going to recount what I learnt, particularly with respect to what features facilitated my first project (https://github.com/Tubster1977/Pythonista_Evaluator).
The ‘Coffee Machine’ project covers Python fundamentals whilst mimicking the logic behind a coffee dispensing machine that you might have used at an airport, train station or office.
The machine provides a menu offering different types of coffee, each with a unique price and quantity of ingredients. It also informs the user about the remaining amount of each ingredient, in the event there is an insufficient total to make the users brew.
The user then dispenses a certain amount of coins. And the machine determines whether or not the user has added an adequate amount that meets the cost of the cuppa before issuing any change.
This was the first project where I had to carefully craft my program; mapping out each stage and ensuring they linked with previous ones. I validated the planning using flowcharts, before prioritising what coding skills would enable me deliver a functional solution.
I’ve italicised Python terms and keywords in the next few paragraphs in case you want to research them later.
By completing this project, I managed to encompass a more organisational mindset. In appropriating nested dictionaries, I was able to perform a range of efficient iterations that gave my program significant substance in terms of flow.
Fig. 1 shows the coffee machine menu. Here we have keys (the coffee type), which have ‘ingredients’ (water, coffee and milk – all nested keys). Each ingredient is paired with a number referred to as a value; which details the amount for that specific ingredient. The numbers in this instance are integers but they can be floats.
Determining the layout of the menu was the first step I addressed. Once I constructed it, I then had to negotiate how to iterate through it.
Fig 1 shows nested dictionaries (indicated by the use of curly brackets).
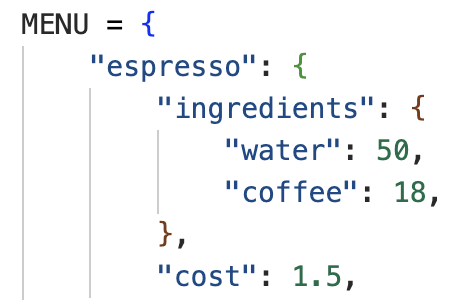
Fig 1. Nested Dictionaries
1c. The importance of understanding programming decisions – functions and the while loop.
Of course, there’s the consideration of variables, such as profit, that need to be updated. Each resource ingredient also needs amending following a purchase. Once I had addressed these, I was able to successfully move on to constructing and customising all the necessary decisions the program needed to perform.
These ‘decisions’ are stored as blocks of code called functions (recognised by the def keyword). Once they are called, functions execute a specific output which normally proceeds the return keyword.
Whilst assembling these functions, I made significant mistakes due to problems in indentations and the improper usage of conditionals, conditions and looping. Nonetheless, the learning was invaluable in preparing me for the frustrations associated with programming and the dedication required to overcome them.
What’s executed in the function can include:
- A set of commands, such as asking a user to enter a value. In this case this it’s either a valid coffee choice or the number of coins for each given denomination.
- A checking iteration. For example, checking to see if each ingredient for a type of coffee is less than what’s available inside the coffee machine.
- An output based on a condition. For example, if the correct amount of money is received then change can be given, else a print statement is executed e.g. “Insufficient Amount!”.
Please refer to Fig 2 for an example of a function.

Fig 2. A function with a for loop to iterate over a dictionary together with a conditional statement
I discovered the utilisation of the while loop to be incredibly useful. Especially when calling functions in a very specific order once conditions are satisfied. I strongly recommend becoming familiar with this usage. See Fig 3.
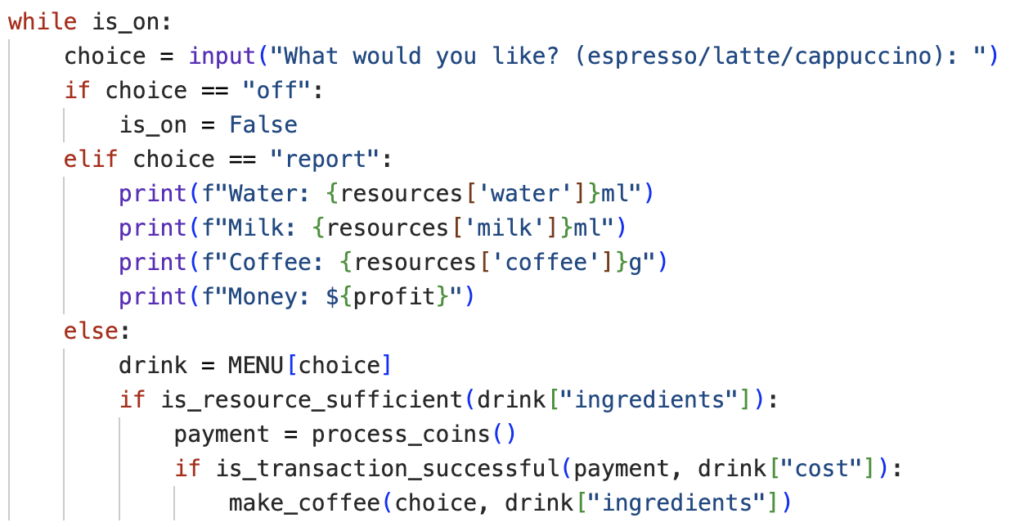
Fig 3. Use of the while loop
Here, I used the while loop right at the end of the program, where all the functions previously created are executed (called) once certain conditions, through the use of conditionals (if, elif and else), have been met.
This little project is a joy for utilising a range of important features found in Python. There is the opportunity to:
- Work with different data types (strings and integers).
- To use operations like multiplication and addition in order to make simple calculations.
- Iterate over a dictionary using a for loop.
- To use conditional statements like if and else to give a very specific output on the basis of a condition being met or not.
- To store all the aforementioned as blocks of code (functions) – which are only executed once they are called.
- Using the while loop to run functions in a logical order.
Please note that this program is not perfect; there is a glitch that hasn’t been caught. If the user enters an invalid coffee choice, the program doesn’t have a way of addressing this. An error message is generated and the program simply exits.
And this is where I need to mention the importance of testing code. Coders often run into problems because they haven’t performed this fundamental task. I will clarify more regarding this when I discuss try and except as tools in error handling a little later.
1. Summary:
- Become familiar with the fundamentals.
- Find courses that cover these fundamentals very early on.
- Complete walk-throughs of programs mimicking real world scenarios.
2. You’ve done the hard part, now it’s time to thrive.
2a. Before attempting ‘Master Python With This One Project’.
Now before I salute the efforts of Tech With Tim’s walk-through, ‘Master Python With This One Project’, I need to mention that he had another very similarly titled one.
This was called ‘Learn Python With This One Project’, and is over a year old now. If you don’t have access to ‘100 Days of Code’, then I strongly recommend going through this project yourself BEFORE attempting the one I am going to discuss for the remainder of this article.
The reason why I would wholly recommend ‘Learn Python With This One Project’ is because it is again trying to mimic something that some people may use in the real world; a slot machine. Whilst I’m no advocate of betting, I cant deny that projects attempting to simulate machines or services in the real world, are both very effective and informative for programming students.
2b. The potential of ‘Master Python With The One Project’ by Tech With Tim.
‘Master Python With This One Project’ is a different beast, so let’s now take a look as to why. You can find the source code here at: https://github.com/techwithtim/Personal-Finance-Tracker/tree/main.
I am not going to scrutinise the detail, but am instead going to summarise why going through this project will help you truly elevate your Python cognisance. Especially so if you want to leverage Python for data analysis by creating csv files that can be interactively updated. I’ve found working with dataframes to be hugely advantageous when attempting to produce visualisations that compliment any analysis performed. This project does significantly more.
Again, this program mimics a financial tracker app, but its so functional that you yourself could use it on a daily basis to:
- Input new sources of income and their values.
- Input specific expenses and their costs.
- Update a csv file with the aforementioned inputs.
- Aggregate total incomings and outgoings.
- Evaluate net savings.
- Output transactions over a specific date range.
- Visualise transactions over that specific date range.
All this functionality together with nuggets of pure gold in terms of gained programming skills, makes this YouTube video truly the daddy of all walkthroughs!
NOTE: I’m not going to deliberate on the libraries and modules imported, but will list them here for your reference so you can research them later: pandas; datetime; and matplotlib.
2c. The importance of comments.
By referring to Fig 4, you will hopefully see that there is a lot of essential instruction being delivered; as reflected by the scale of my commentary. There was just so much wealth in this video I couldn’t help but buoyantly annotate.
Top tip: annotation aids your recall and helps others comprehend the logic behind the code you have created. Please do not be daunted by the code, it’s not my intention to teach you everything step-by-step, but to simply share good practice.
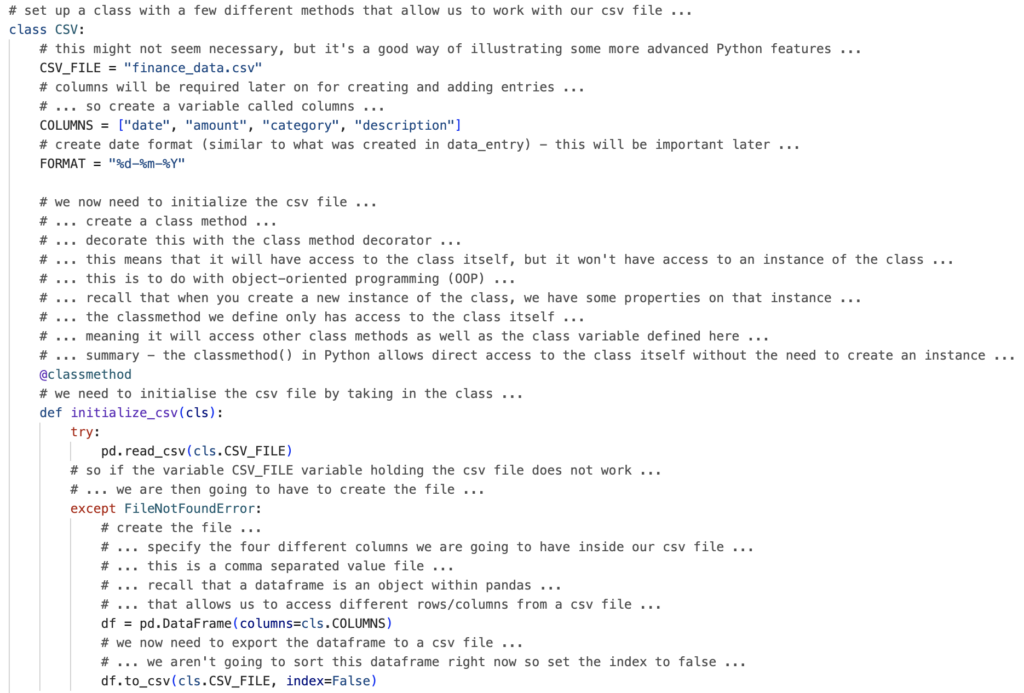
Fig 4. Setting up a Class to work with a csv file
2d. Working with CSV files and using Classes and Decorators.
Now, whilst I’ve personally implemented csv files in Python using the Pandas library, I haven’t actually created them from scratch using a Class. You can learn more about Classes by clicking on the following link: https://www.w3schools.com/python/python_classes.asp, but I do encourage you to explore Python Object Orientated Programming (POOP) before using them. And if you can’t laugh at the POOP acronym you’re clearly dead inside.
Whilst Decorators are for the advanced practitioner, this was a perfect introduction into one way in which they can be used. Using Decorators like @classmethod (see Fig 4) cuts out the requirement to create instances of a Class. Multiple instances should be minimised as they can compromise the readability of a program whilst also making it difficult to access specific attributes of that Class.
Simply put, Decorators allow programmers to have access to functional components of the Class (which have access to all the properties of that Class) without the need for instances. For me personally speaking, this was an absolute revelation.
2e. The importance of testing your code.
Fig 4 illustrates further good practices through the testing of code. First, the programmer will use the try block to see if the CSV.FILE created earlier can be read. In the event of that not happening, a very specific error needs to be caught. In this case, the error is called the ‘FileNotFoundError’, which is then handled by the except block. This ties back to what I mentioned earlier on the importance of testing your code, thus containing bugs and their nefarious effects further down the line.
Testing your code will improve the performance and reliability of your program and I must stress that this is a must for any true Pythonista. This is not the only place where the code is being tested with try and except blocks. There are another two examples that I won’t go into, but they both attempt to catch a ‘ValueError’.
For a comprehensive list of the different types of exceptions in Python, check out https://www.geeksforgeeks.org/python-exception-handling/. I regularly refer to this when attempting to identify the types of errors that could nullify my code.
2f. Pandas, Datetime and data analysis.
What I liked about the use of the @classmethod Decorator shown in see Fig 5, was the incorporation of datetime objects. To summarise, once you have a readable csv file, you can filter the different transactions on that csv file, provided you are reading the file as a stored dataframe. Again, you should see a lot of annotation through the volume of comments I’ve produced. I suggest just casually referring them and not get too overawed by the detail.
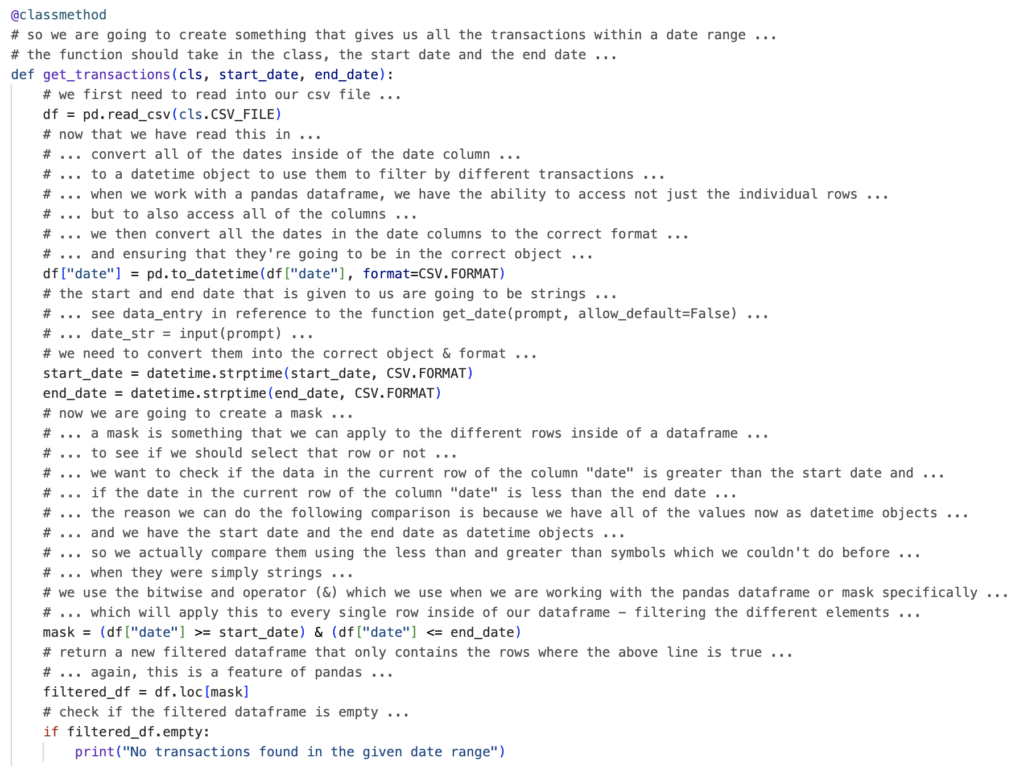
Fig 5. Using the Decorator @classmethod utilising the datetime module together with masking
Creating a dataframe is only possible through the Pandas library – which also allows you to access rows and columns on that created dataframe. However, in order to filter by dates, you need to use the datetime module.
This module ensures the dates in the dataframe are in the correct format. Once these are in the correct format, any dates entered as strings in a transactions enquiry, i.e. start and end dates, can then be converted into the correct object and then formatted using the strptime() method. This then enables programmers to construct the code necessary for date filtering.
The date filtering itself is achieved through a mask, which is a feature we can apply to the different rows inside a dataframe. This basically enables users to determine what rows to select and which to discard when analysing the data. Getting to grips with the datetime module is fundamental to Pandas, especially if you want your program to perform filters using dates. My application of the datetime module has been elevated as a consequence of watching this code-along.
2. Summary:
- Once you have created small projects independently, read up on dataframes, datetime, pandas and matplotlib.
- Address error handling to improve the reliability of your code.
- Attempt ‘Master Python With This One Project’.
- Become increasingly familiar with Classes and Decorators.
- Work towards Python Object Oriented Programming (POOP).
Conclusion
There is obviously so much more I could talk about here, but my main intention was to assist you in gaining an appreciation of what progressive learning looks like. I promoted the content creators purely for their ability to weave complex ideas with dexterity and ease. Anyone that can do that should be given the credit they rightfully deserve.
The first part of this article outlined the fundamentals, including functions and the importance of while loops. I then went on to express the necessity of immersing yourself in POOP. Sorry, I just couldn’t help myself.
Next, in proposing a criteria for levelling up, I recommended the incorporation of Decorators in refining access to Classes whilst making POOP more efficient and cleaner. That was bad.
This was followed by merely skimming the potential of the pandas library for data analysis. Nonetheless, this short yet efficacious intro demonstrated the transformative power of pandas, especially when combined with the datetime module.
Whilst I haven’t mentioned it above, what really encouraged me about the Tech With Tim walkthrough was the level of interaction the user can have with the program. This reciprocation leaves learners with the impression they are engaged in using an app. I’ve used matplotlib on numerous occasions, but I have never utilised prompts to generate visualisations through a simple yet highly effective interface.
For me, it was that interface that both highlighted the functionality of the program whilst celebrating its robustness. The genius lies in the programmer producing something app-like, offering efficient, effective and at times elegant capabilities.
Content creators sometimes get too caught up producing an exhaustive list of unnecessary functions, that they lose sight of the learning intentions. This wasn’t the case for ‘Master Python With This One Project’. It was utterly seamless.
I have every confidence you could talk at length about this project in job interviews, or maybe even your own blogging website. So what are you waiting for? Get on to YouTube and just follow along to ‘Master Python With This One Project’!
Take care everybody and please keep a look out for my next article.


What do you think?
Show comments / Leave a comment